• START HERE!
    • ABOUT CARLY
    • CONTACT
  • FASHION
  • BODY POSITIVITY
  • GIRL POWER
  • SD LIFE
  • DISNEY
  • SHOP MY INSTAGRAM
  • SHOP MY FAVES

Lipgloss and Crayons

home

How to Start a Garden From Scratch: Garden Soil Preparation

This post may contain affiliate links. Purchasing through them helps support this website. This post may also contain items gifted for consideration.

Want to know how to start a garden from scratch? This is the ultimate guide to garden soil preparation for newbie gardeners! Want to know how to start a garden from scratch? This is the ultimate guide to garden soil preparation for newbie gardeners! 

Ok, now let's be honest.  Instagram made me do it.  Since spring I've seen people gardening and shrugged it off.   This summer? I hopped on the bandwagon.  I wanted to garden too! Here's the deal….I don't even like DIRT.  I had no idea was I getting into.  You have to laugh, because……had I known what a process garden soil preparation would be, I never would have started.  But you know what else I am? Stubborn.  If I start something, I have to finish it.

So I did it.  I turned our hard as a rock, clay soil filled and abandoned plot into a garden (well at least the dirt preparation part).  We moved into our house in San Diego a little over a year ago…..and this plot? Was empty.  Dirt and an old palm tree stump.  When my garden fantasy began, I knew it was the perfect space to turn into a small vegetable garden.  I gathered my essential gardening tools, and got to work!

How to Start a Garden From Scratch: Garden Soil Preparation

Garden Soil Preparation: BEFORE (clay soil, San Diego)

< can you believe this before? the rocks were out of control! >

Here are the steps I took in our garden soil preparation process.

  1. Stump Removal: The first step for us? Was removing the old palm tree stump.  Now, while we could have used stump remover and TRIED to do it ourself…..it seemed like a pretty big undertaking.  We hired a tree removal service.  They ground out the stump and removed it's pieces.  They also remarked that there were a LOT of rocks in the plot (that should have been a warning right?)
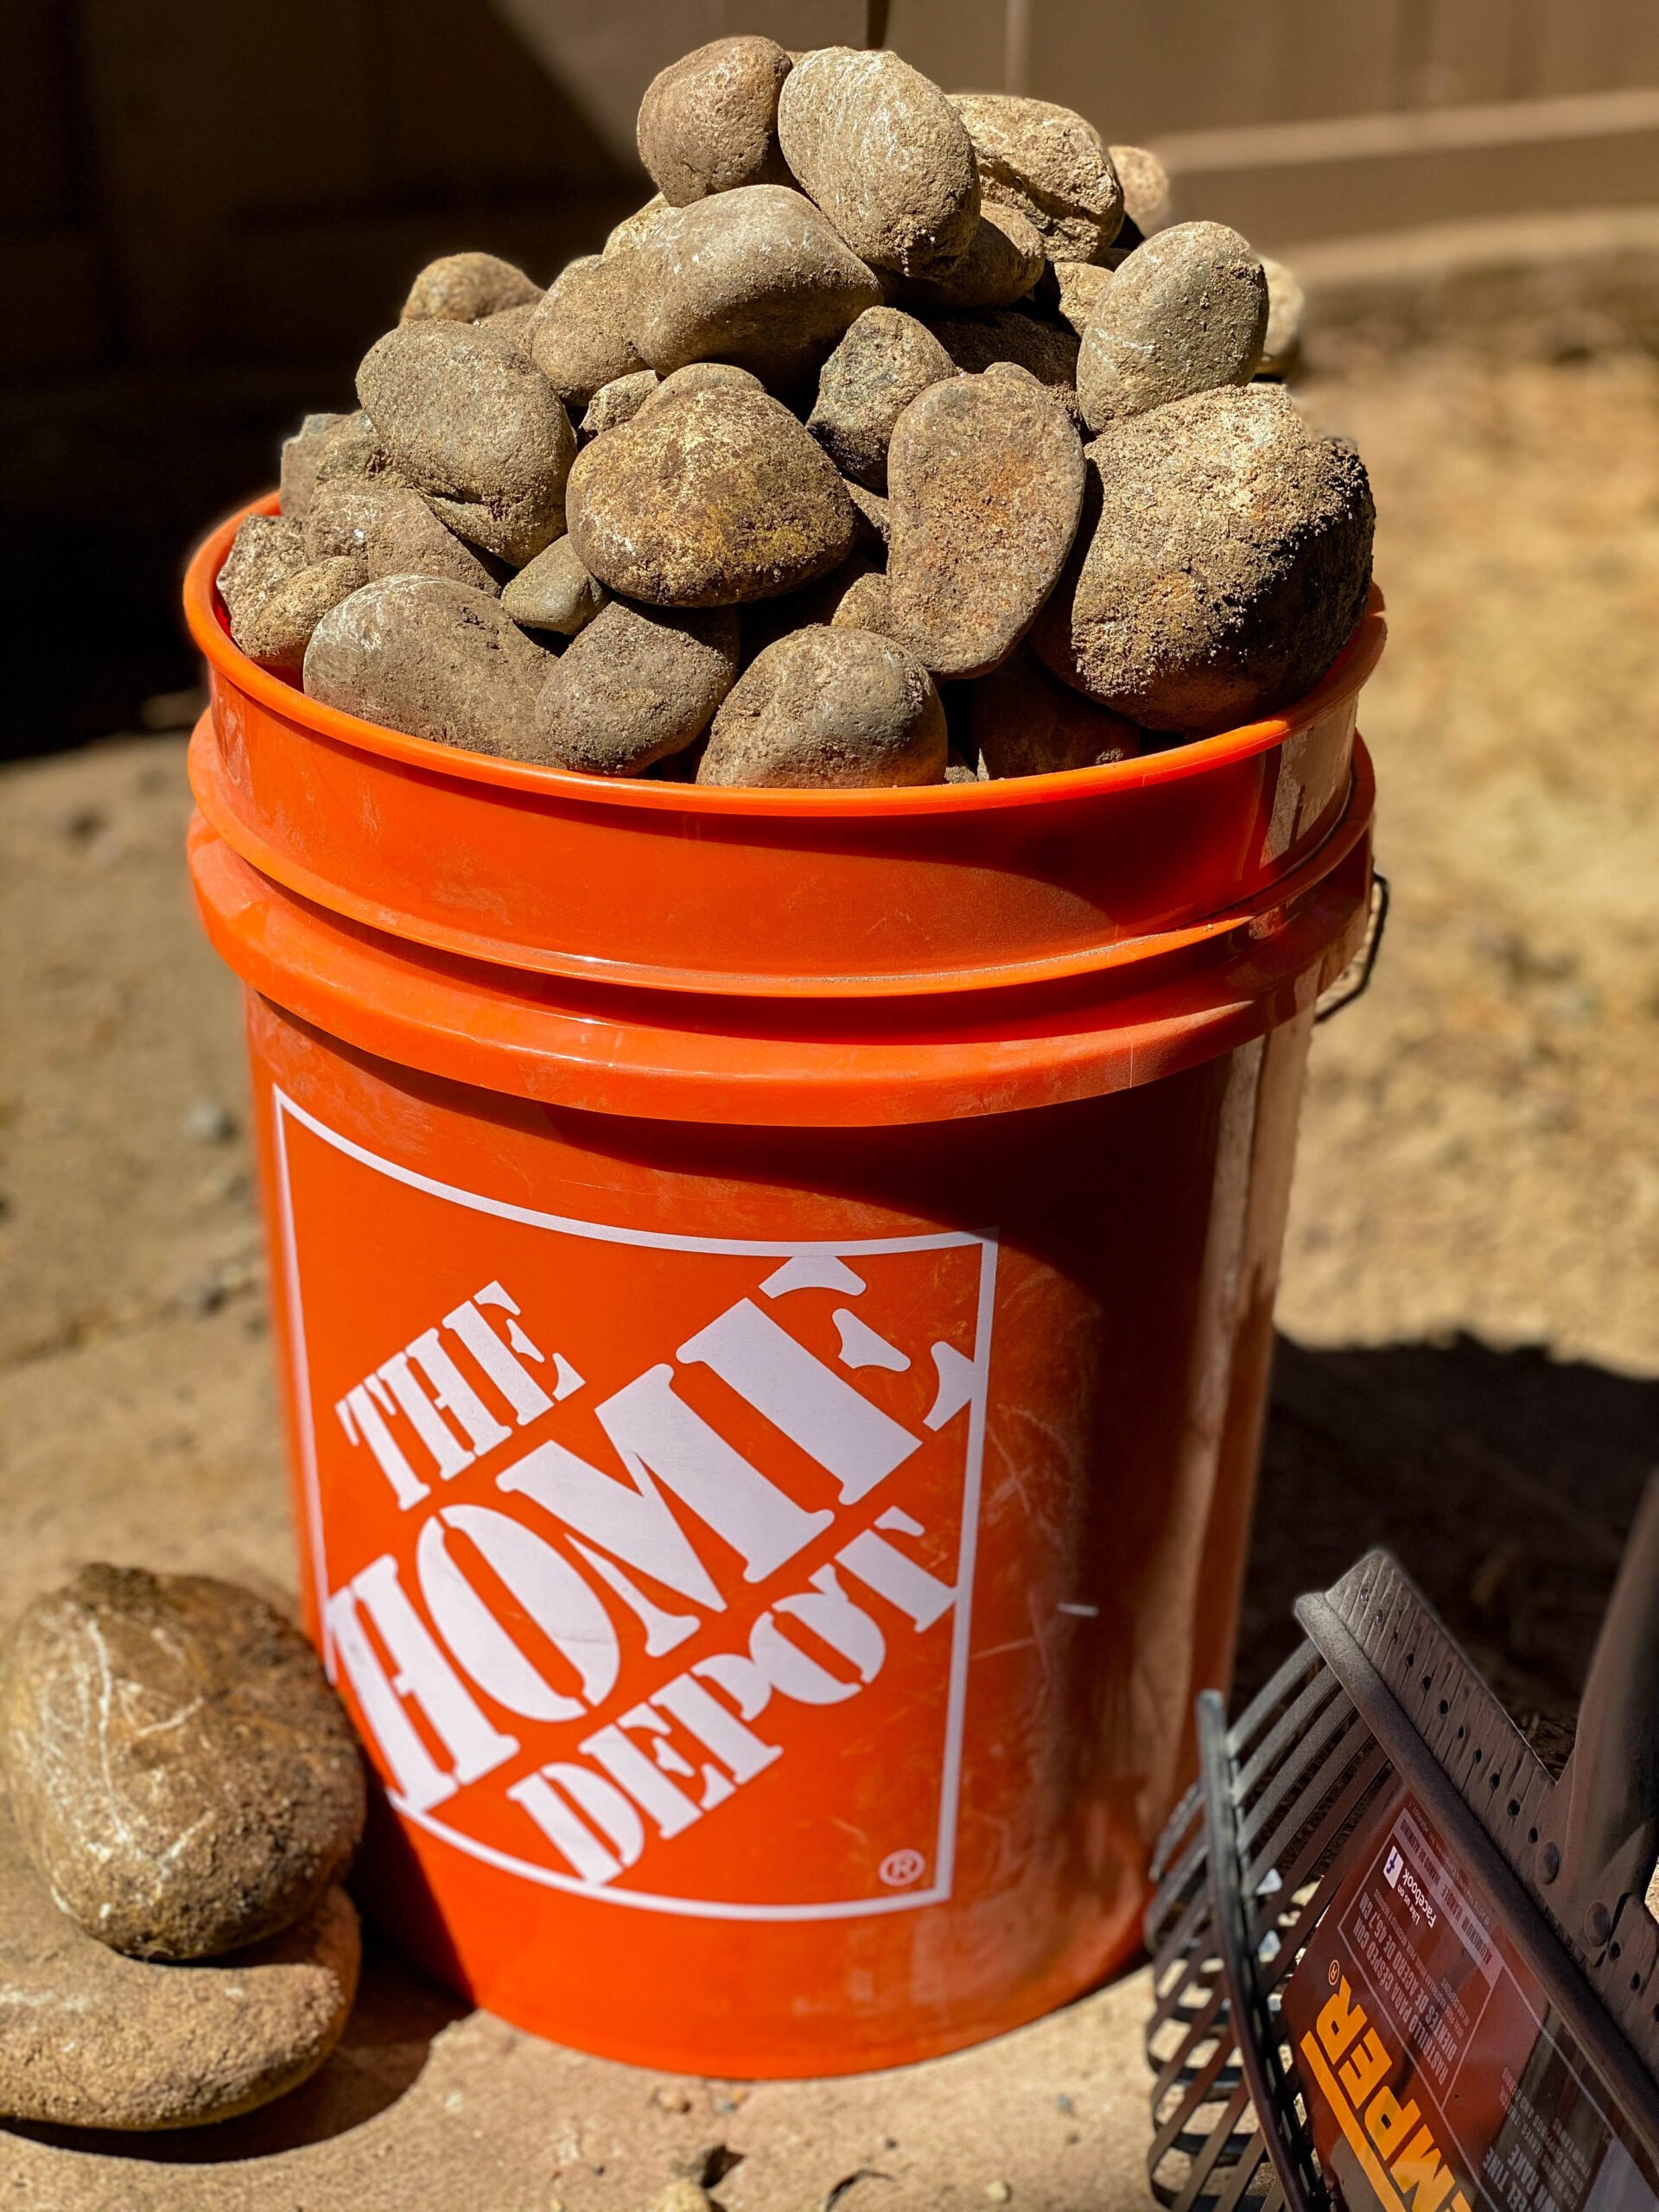
  2. Remove Large Rocks: Yes, I know that roots can grow around rocks.  But did you see the HUGE rocks I pulled out of the plot? There were so many, that I worried they would make it hard for plants to grow.  Plus, I was trying to remove a few inches of clay soil so that we could add in healthy garden soil for planting and the more rocks I removed? The lower the soil level.  Fast forward over a thousand large rocks, some sore arms and hands……and the rocks were MOSTLY gone.  At least the larger ones.Garden Soil Preparation: Rock Removal
  3. Soil Level and Clay Soil Tilling: Now here's the part of garden soil preparation that took……three weeks.  Since our soil is HARD clay soil, it was a slow process.  Breaking apart the soil, removing the dead palm tree roots (they're STUBBORN) and taking away enough soil to lower the plot's dirt level about 3 or 4 inches.  We could have a used a rototiller, but…..I ended up doing it all by hand with a hand tiller.  There were still so many large rocks I was afraid they'd break a machine (and I removed more of them as I went by hand)…..plus I had a little fear about lines under the bed.  So, one day at a time.  I broke apart the dirt and worked my way through.  It was exhausting, but it was the best way to work through the heavy clay and to really turn it over.                                                                                                            Shop Hand Tillers Here:                                                                                                                                   
  4. Build and Install Raised Bed: After a LONG set of days digging and tilling…..I took a break to build and install our raised bed.  The galvanized raised bed we got? Was SUPER easy to put together and the perfect size for our smaller garden plot.                                                                                                                          Shop Raised Beds Here:                                                                                                                                     
  5. Layer of Healthy Garden Soil: So if you watched as I worked on this step on Instagram stories, then you know we had a few bumps in the road.  By we, I mean me.  I went to the Garden Center and picked up what I thought was soil to create a nice layer of healthy soil for our vegetable garden.  What I actually bought? Was amend for the soil.  I needed that, but it wasn't enough on it's on.  So back to the store I went.  The second time I got it right.  Six bags of soil, spread over the broken up clay soil was the perfect amount.  I got about 3-4 inches of nice healthy soil ready for planting.
  6. Amend the Soil: Working on amending your soil?  Why? You're basically adding essential nutrients to your soil to create a better environment for your plants and crops.  Since our soil is……terrible, I used a great amendment and then added worm casting after that.
  7. Worm Castings: All my garden friends swore that worm castings were a requirement for my garden.  Not a ton, but just a light sprinkling on top, then mixed into the soil.

Garden Soil Preparation: After

And with that? Garden Soil Preparation complete!

0 Leave a Comment

Subscribe to L&C Weekly!

Reader Interactions

Leave a Comment Cancel reply

Your email address will not be published. Required fields are marked *

Previous Leather Leggings Outfit Ideas
Next American Girl Doll Addy: Lessons and Activities

Related Posts

Console Table Decor Ideas

Our Pool Deck Furniture

Our Home Was Burglarized: What I Wish We’d Done B...

How to Build a Kid Friendly Home Library

Primary Sidebar

Search

NEW? START HERE

DISCLAIMER

We are a participant in the Amazon Services LLC Associates Program, an affiliate advertising program designed to provide a means for us to earn fees by linking to Amazon.com and affiliated sites.

Have you ever attended a luau? This was the first Have you ever attended a luau?This was the first I’ve EVER attended (fun fact, when we came to Aulani 5 years ago we were supposed to and it was rained out). The night before on this trip, we had some storms and I thought….oh no, round 2? But……the Hawaiian sun did it’s job and the weather for this was PERFECT. To be honest, this was not cheap.  I was a little apprehensive about whether I would feel it was worth the money but…..WOW was it ever.  The food was amazing, there were really fun activities for kids at the beginning and the cultural performances were phenomenal.  All three of us (including not wanting to spend even more $$$ vacation Robbie) left raving about the experience. Aulani wins for us so far on this trip that I’m so glad I booked in advance (highly suggest doing this as far out from your trip dates as you can)- the luau (try night 2 or 3 of your trip so you’ve had time to adjust to the time change)- Aunty’s Beach House (this is still at limited capacity so you DO need to book in advance, I booked a session for days 2, day 3, and day 4 and we’ve enjoyed having a bit of time each day)- character dining and prix fix dinner at Makahiki (we are one big meal each vacation day people, so DON’T book these the same day, I’d do character breakfast early on your first full day….you’ll wake up early with the time change and the dinner on whichever night you AREN’T doing the luau)Already dreaming of booking another trip here.
🌴🌺Postcards from Aulani: the Food and Charac 🌴🌺Postcards from Aulani: the Food and Characters are the Best🌺🌴(if you could only pick one of these treats, what would it be?!?)🌺 Mickey Masubi from the Ulu Cafe🌴minnie red velvet waffles (character breakfast at Makahiki)🌺 aulani special from the coffee cart (available each morning until 10:30 am)🌴olu rice crispy treat from the Ulu CafeFav meals so far (ha) were both at Makahiki.  We LOVED the character breakfast (so many unique local food offerings) and the Disney Team treated us to the prix fix dinner our first night here….I can’t even begin to explain what a lovely experience it was.  Killer cocktails, a GREAT kids’ menu and I had the best Ahi of my life.Now swipe all the way to end for an appearance from Vacation Robbie.  We love to see it.And place your votes…..pick ONE treat.
Five years ago. This exact place. Robbie had jus Five years ago.  This exact place.  Robbie had just finished two years of grad school.  And it had been a long, tough two years.  That year involved one major teacher strike in my district, many many many jobs and gigs for both of us, minimal time off together, a whole lot of unknowns and a whole lot of stress.The Disney and Aulani team probably had no idea that they were giving us the gift of much needed peaceful time together when they invited us on a trip to this magical place.  A trip that….to be honest, was beyond our means at the time.  We cherished every moment. A lot has happened since then.  A move, buying a house, seeing those years of hard work pay off.  And now….we did it.  We’re back.  Lazy river here we come. TLDR? If you’re in the thick of it, I see you.  We’ve been there. Family, Welcome Home……we did it.  Aulani for the week.
Now, if I’m being totally honest…..this pulled Now, if I’m being totally honest…..this pulled muscle? I should have known better.  When training for my race, I didn’t stretch or warm up enough most days and….here we are.Lesson learned.  I’m 4 weeks post race (do not recommend running a 10k on a pulled muscle) and I’m……almost better.  I’m learning to stretch and walk and to take better care of myself so that I can start running again REALLY soon (we’re almost there I think).For now? I’m doing recovery walks and trying to strengthen my leg.  And trying to make sure I get enough protein.  When I talked about Built Bars on my stories, a LOTTTTT of you raced about their Puffs.  Yup, I get it.  They’re AMAZING.  I’ve been bringing them along on my walks (and gluten free friends….they have some great options for us).Have you ever pulled a muscle? What was recovery like for you?#youGOTTAtrythis #BUILTProtein #BUILT #BUILTbar partner
💕Double Tap when you see who we found at the zo 💕Double Tap when you see who we found at the zoo (and swipe to the end for a close up)⠀⠀🌴Coming to San Diego for Spring Break or a Summer Vacation?⠀⠀📍Let’s talk San Diego Zoo (and yes, I got off a plane yesterday, picked up Lydia and we spent the afternoon at the zoo…..it was LOVELY).⠀⠀A few things to help you plan visits to San Diego and the Zoo:⠀1️⃣ the San Diego Zoo and Safari Park are NOT close together.  The Zoo is close to downtown, the Safari Park is about 25 miles north.  I’d suggest one day at each.  They’re totally unique and both worth a visit.  The Safari Park is smaller, but has REALLY unique exhibits (Walkabout Australia is my favorite).⠀2️⃣ both have some really fun and unique dining experiences that you can reserve in advance: Albert’s at the Zoo is a FANCY and fun sit down option, and The Watering Hole at Kijamii Overlook at the Safari Park is great for happy hour or a fun lunch ⠀3️⃣ there are great kids play areas at both locations, the Wildlife Explorers Base Camp area at the San Diego Zoo is brand new and absolutely amazing⠀⠀✨ Now, a bonus tip.  Undercover Tourist now has NATIONWIDE savings on over 500 attractions in 50 cities and up to 25% on tickets for theme parks, zoo, museums, aquariums, city tours, water parks, and movie tickets. And the deals they have for San Diego?  AMAZING (I’m sharing details in my stories).⠀⠀@themeparkfrog #UncoverSavingsNationwide #ad
  • Collaborate
  • Speaking
  • Contact Carly
  • PRESS
  • Privacy Policy
  • Fashion
  • Body Positivity
  • Girl Power
  • SD Life
  • Disney
  • Travel
  • Highlights

© 2019 LIPGLOSS AND CRAYONS  |  SITE DESIGN: MLL DESIGN STUDIO  & FUZE BRANDING